Saturday, January 23, 2010

Other Crafty Adventures: Crocheted Skull Caps


So maybe I will blog all my crafty adventures here. I picked up my crocheting after a LONG time of not making anything. I decided to try to work a pattern and make something. I have known how to crochet for 13+ years and I have *never* actually followed a crocheting pattern to complete a project.
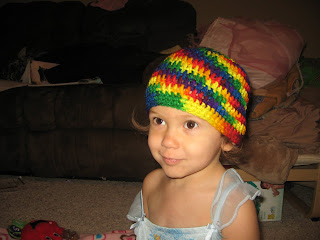
My high school/college boyfriend's mom taught me how to crochet. Because I learned from a person, I was never able to understand how that translated to the written pattern. I was never taught how to read a pattern, I was only taught how to *do* things. So, I have made pot holders and baby blankets galore (and even a purse or two) but I have never followed a pattern - until now.

I found a really cool website with free patterns that you can download (and not-free patterns too). www,youcanmakethis.com
Here is the link to the pattern that I downloaded and used to make this nifty, neat rasta-style skull cap for the kiddos.

I am making matching ones for all of the girls. But can I get them all to wear it? That is the real question.

Tuesday, January 12, 2010

Boxy Bag for the Boy


My dear husband is a hard worker. He carries around his computer bag and computer tools and supplies with him all day. One thing he needs to carry are several different plugs and wires (I don't know what they are really called). He used to have a few things loose, then he had a few in different pockets of his main computer bag. Then, he started carrying them all around in a little box. But he complained that the box was too bulky. So...he commissioned me to make him a bag for them.

So I looked around for what kind of bag would work for his needs. I found a lot of styles of bags - little purse bags and totes and make-up bags. And then I stumbled onto the right kind of bag...the Boxy Bag! Even better than finding the right KIND of bag, was finding the right tutorial to help me actually make the bag. Here is the awesome tutorial I followed.

This is only my 2nd or 3rd time working with a zipper. I think I need to take a class and get some more tips. The bag took 2 1/2 hours total to complete. I had a little difficulty with the zipper and don't look too close at the handle (because it's not exactly centered over the seam).

All in all I am happy with it. It's boyish, home-made and utilitarian.

My very first quilt


I decided to try my hand at quilting 2 years ago. Would you believe that this is my FIRST quilt...still? Don't get too excited...it's not finished yet! You would think it is a masterpiece taking me this long to make it. But, no, it's my introduction to quilting.

I signed up for a class, thinking that would be the best way to learn. Well, the "Winner's Bouquet" Quilt doesn't seem like a beginner's quilt anymore. Notice how they say on the pattern, "You'll be amazed at how simple curves can be". Well, frankly, I am amazed that I
got this far into this quilt and have the top *almost* done!

So, here are a few pictures of my current progress. I need to add the border, layer my pieces and then it's ready for quilting. I am thinking of having it professionally quilted on a long-arm. I don't want to ruin my very first quilt by trying to free-hand it. I think I will try free-hand quilting a few other projects first. I surely don't want to hate my new quilt after I invested so much time into it.

Sewing with Kids


My mom bought my daughter a sewing machine Christmas 2008. My daughter was 6 at the time and was excited to get started with "mommy and granny". She got a really cool kids sewing book filled with great projects for kids. Here is the book on Amazon if you are interested.

So far, she has made 6 placemats, a quilt and is currently working on beanbags. At first, we had to supervise her pretty closely...but by the time she got to the last placemat, she was doing most of the work all by herself. Her are some pictures of her projects in various stages:

Sunday, January 10, 2010

The Wristlet Purse


I have been trying to dedicate myself to going to the gym regularly. Since we practically live right across the street from it, it's not a big deal to run over there and work out. Since we are so close, I don't want to take a whole gym bag over there with me, unless I am planning to swim. So, the only thing I like to bring is my Zune and headphones, my keys and my phone. While it's not that much stuff, it is pretty awkward carrying all that in my hand. My solution? The Wristlet!

I scoured the internet for a tutorial to make just what I wanted....and I stumbled onto the perfect tutorial right here on blogspot! Here is the link to the awesome tutorial!

I made one for myself for the gym and then my little girls wanted one too...so I made 2 more!

My New Sewing Space

Since I posted about my new sewing space when I sewed the machine cover....I thought I would post a few pics of the new space:

Here is a picture of the corner nook where I can sew now. I sew sitting at the desk table (which I also share with the big kid for homework and for her sewing too). There is a nice light in the corner to help with the shadows too. I cut on my craft table which opens up. I did have to share the corner just a bit and put the big printer over there.

My next project is to figure out a good way to organize the space with all of my sewing items...while keeping it "baby safe" for the little ones. I am thinking shelves....

Sewing Machine Cover


Well, after we moved...my "sewing room" moved down to the basement in the corner of the TV room. Luckily, the room is large and there is a little nook in the corner for me to put my sewing desk and craft/cutting table. However, I either have to cover my machine or put it away after *every* use because of a rascally little 2 year old who likes to push buttons.

So I decided to take the plunge into sewing a cover for my machine. After measuring the machine, I decided to modify the pattern a bit. This was my first time trying to modify a patter and I only had to re-cut twice. After all the modifying, I finally got all the right pieces cut out. Then I realized that I was supposed to use fusible fleece....which is not what I bought and just cut out. I decided to go for it anyway and just be careful!

After I got the whole thing sewn....I put it over my machine...and it's about 2 inches too TALL. OH No! Well, you can't tell from the pictures that I messed it up. The first picture shows it as I just tucked that little extra bit under and placed it over my machine. At least it works. It keeps the mini-fingers away from "buttons! push buttons!!" The last picture shows it full-size...pretty tall!

Now for my 7 year olds mini-sewing machine.....
Do I make a matching cover? Do I dare try to modify that pattern to be smaller? Hmm...maybe for now we'll just have to put that one up after using.